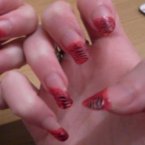
How to do...A striked through manicure
With increasing numbers of creative ideas and artistic developments being brought to the table in a bid to make our nails as appealing and decorative as possible, women can do nothing but indulge themselves in a little pampering.
This week we have a simple yet effective design that will keep people guessing for hours as to how it was achieved. The great news is that it doesn't take as long as it looks and you can be as experimental with colours and pattern as you like.
French manicures have inspired a whole host of tipped ideas of late. Everything from the inverted manicure, to the slanted tip to the multi coloured mani, there are so many options.
The design that I'm about to share with you is perfect if you're as indecisive as me when it comes to picking out just one nail colour.
Ladies, now you don't have to limit yourself!
To create the look, you will need:
A base colour of your choice
About 3/4 colours to sit on top (preferable shades that go well together)
2/3 Toothpicks
A piece of kitchen roll or sponge


So...
1. Apply a slanted tip colour to the top of the nail. This needs to be quite deep, so if you have short nails, don't worry about using half the nail for this. Mine are quite long and so I like to leave only a little of the natural white tip showing.
2. Add a second coat and wait for this to dry.
3. When the coats of polish are dry, take the lids off all the colours you are planning to use, leave them resting on top of the pots as this will make it easier for the next step.
4. With your first colour strike a vertical line down the coloured tip on the nail - stop at the point where your colour does, in my case the pink. Add two lines if you're using thin brush polish pots.
5. With another colour add another vertical line to the tip and repeat the process with the other colours until the nail tip is cluttered with as many colours as you like.
6. Take the tooth pick and gentle drag it along the diagonal, slanted tip of the nail. Do this as many times as possible on the nail tip to create the effective strike effect to blend all the colours together.
7. After each strike, you may find that the toothpick needs to be wiped clean, hence using the kitchen roll or sponge for this.
8. It doesn't matter if the lines are not perfectly straight in the diagonal line. It all adds to the expression and effect of the nails. Depending on the colours you choose, you can go wild with animal prints or vibrant with pinks and reds like I have here.
9. Leave the whole set to dry and then apply a top coat to add shine and protect the nail.
And there you have it...
Top Tips...
As tempting as it may be avoid using cotton wool to clean the tooth picks. It will get stuck to the polish and you'll get in a fluster trying to fight the wool for your toothpick and ruin the vertical/striked lines on the tip.
As well as going for different shades of pink on my manicure I chose a red and black too. This adds instant impact to the look and helps to create definition to the look.
Why not let FemaleFirst know what nail arts you're loving this season?
FemaleFirst Jenna Fordie twitter: @Jenna_FAM
Tagged in Nail Art

